
Bulk installation for Chrome on PC
- Go to the server that manages the group policies and login.
- Go to the link below and download Google ADM / ADMX templates: https://dl.google.com/dl/edgedl/chrome/policy/policy_templates.zip
- Extract the files to C:\Google Group Policies Templates\
- Open Group Policy Management.
- Right click on the GPO you want to configure and click Edit.
- Go to Computer Configuration > Policies > Administrative Templates, and right click on Add/Remove Templates
- Click Add and choose the file C:\Google Group Policies Templates\windows\adm\en-US\chrome.adm
- Close the Add/Remove Templates popup.
- Go to Classic Administrative Templates > Google > Google Chrome > Extensions, and, in the right panel, double click Configure the list of forced installed extensions.
- From the radio button, select Enabled.
- In the panel under Options, click Show.
- To the list in a new row, enter the following line: mahfncngjcmmhemjlbdiogjnngdcajab; https://clients2.google.com/service/update2/crx
- Click OK on both the open windows to close them
- Open the run window on the clients' computers (Windows + R).
- Run the command: gpupdate /force

Bulk installation for New Edge on PC
- Download the Edge Administrative Templates from here: https://www.microsoft.com/en-us/edge/business/download You will need to fill out the required fields and click the "GET POLICY FILES" button
- Open Group Policy Management
- Create a new GPO for the policy (or add to an existing policy)
- Right-click your GPO, and select “Edit”
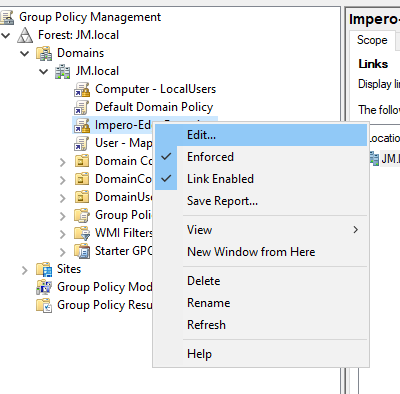
- You will then see the “Group policy management Editor” window
- Expand the Computer/User configuration tree on the left-hand side, depending on how you wish to configure your policy
- Right-click on “Administrative templates” and select “Add/Remove Templates”

- Click on "add"
- Browse to the templates you downloaded in step 1 and open the “msedge.adm” template that is relevant to your operating system and Language.

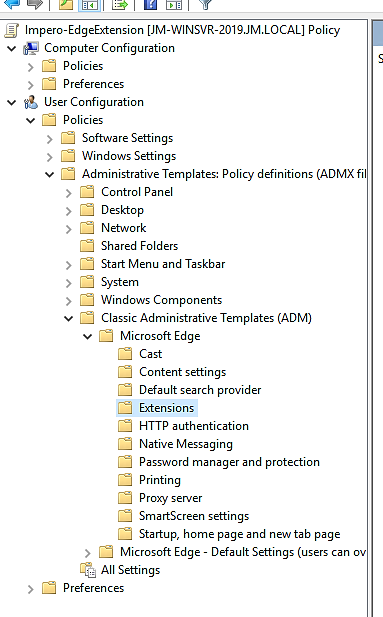
- Once uploaded, expand to the following path (may vary depending on your OS) on the left of the Group policy management editor:
“Computer/User configuration > Policies > Administrative templates > Classic administrative templates > Microsoft Edge > Extensions > ”
- On the right-hand side, select “Control which extensions are installed silently”
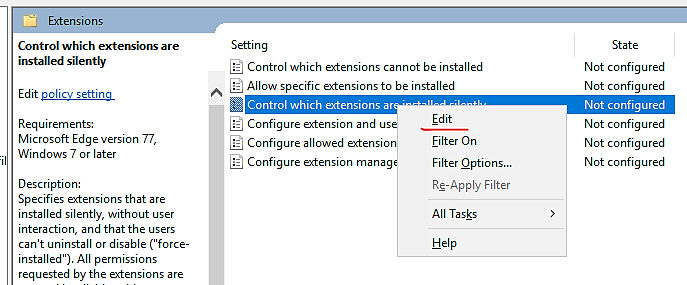
- Right-click, and select “Edit”
- Mark the “Enabled” button
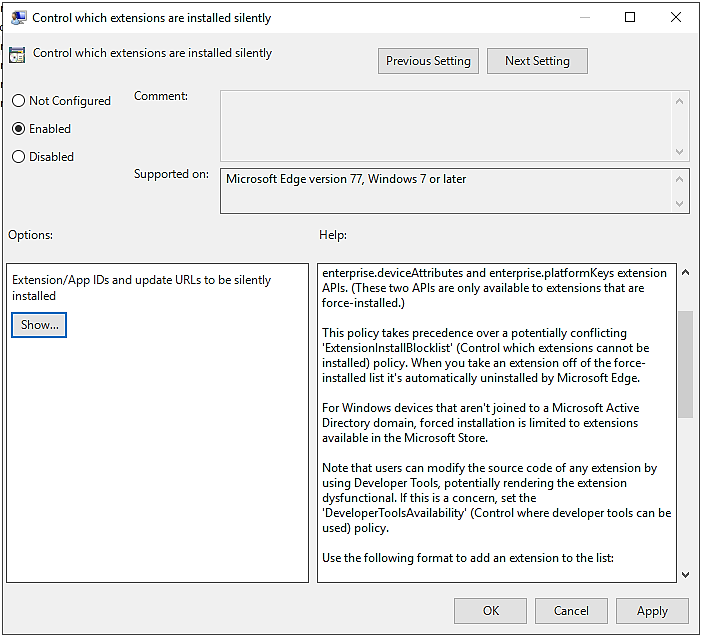
- Click the “Show…” button
- Under the “Value” column, enter the following: fpgebigbgnplnghkglogdclngficjjij;https://edge.microsoft.com/extensionwebstorebase/v1/crx (Please make sure you have no blank spaces in the Value Box)
- Click “OK”, followed by “Apply”
- Back in the Group Policy Management window, assign this policy to users/computers as normal
- Users affected by this GPO should now see the Edge extensions installed and enabled automatically (once the GPO has updated on their machine).
- To enable Developer Mode in Windows 10, set the above policies to Enabled and then click Apply followed by OK.
- Reboot your PC to save changes
Common Group Policy Problems and Troubleshooting
- Policies can be attached at different levels of the Active Directory structure, and there is a specific order in which these levels are processed. If there's a conflict on the same setting in multiple policies, the last one applied wins.
- Exceptions to the default order of precendence (such as like 'block', 'enforce', 'loopback') are possible. However, it is usually considered best practice to minimize the use of these. They change the way policies are collectively applied and make things more challenging to troubleshoot.
- Remember that new policies may take time to replicate to additional domain controllers and eventually reach the specified users. Servers in the same geographic site may sync as quickly as 15 minutes. However, the default interval for servers on different sites 3 hours.
- As documented above, we recommend applying these settings to the user rather than the computer for most scenarios. This usually leads to more consistent and predictable results. The 'loopback' option may be useful for situations where you want all users that logon to a specific computer.
- Use Rsop.msc to gather computer policy - Windows Server | Microsoft Learn A point-and-click tool used to display RSoP information. (Not available on all computers)
- gpresult | Microsoft Learn A command-line tool for Windows that allows you to pull RSoP (Resultant Set of Policy) information for a specified user and / or computer.
- Get-GPResultantSetOfPolicy (GroupPolicy) | Microsoft Learn A PowerShell command that writes RSoP information for a specified user and / or computer to a file.
Installation using InTune
Microsoft InTune can be used to deploy our extension out to your users or devices. Here are the pertinent differences from the UI in Group Policy Management.Create the Configuration Profile
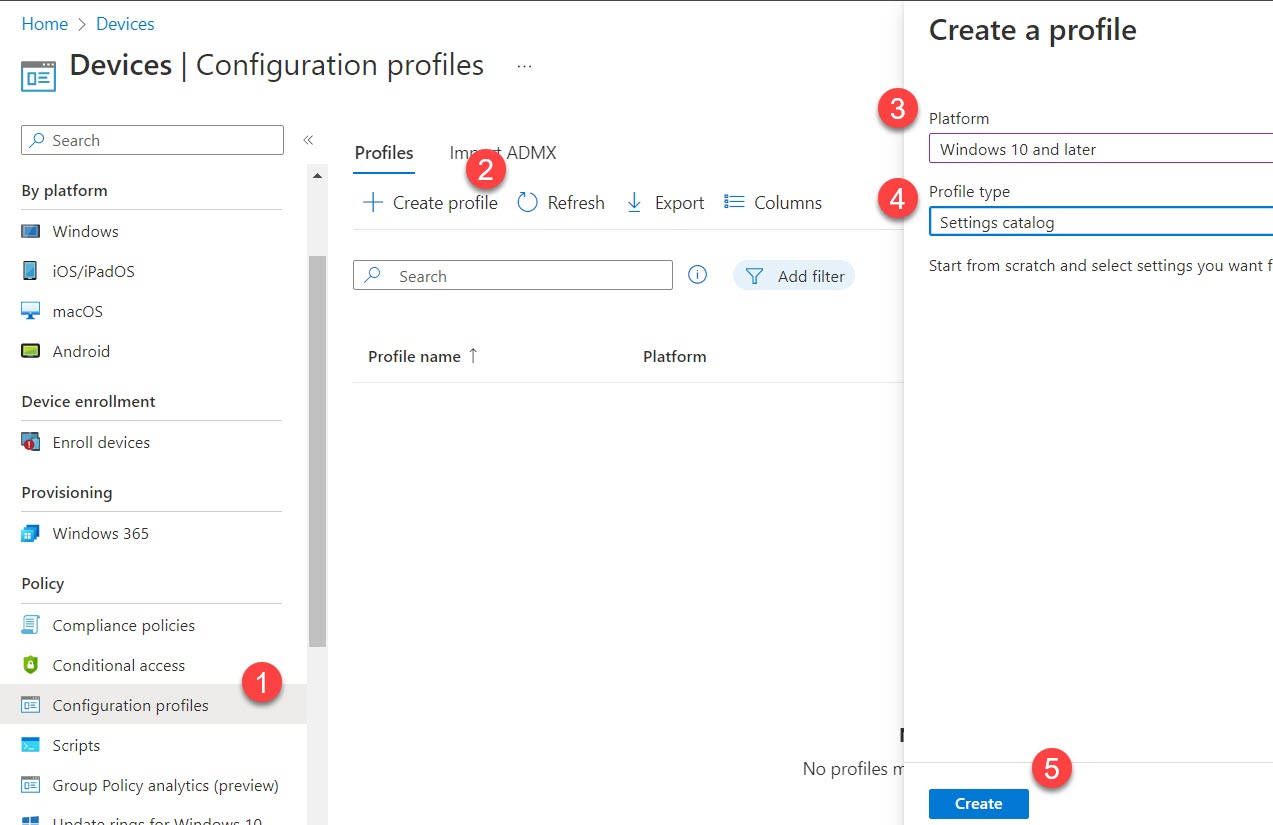
- Go to Devices > Policy > Configuration profiles page
- Click Create profile
- Select your Platform
- Select your Profile type (Settings Catalog)
- Click the Create button
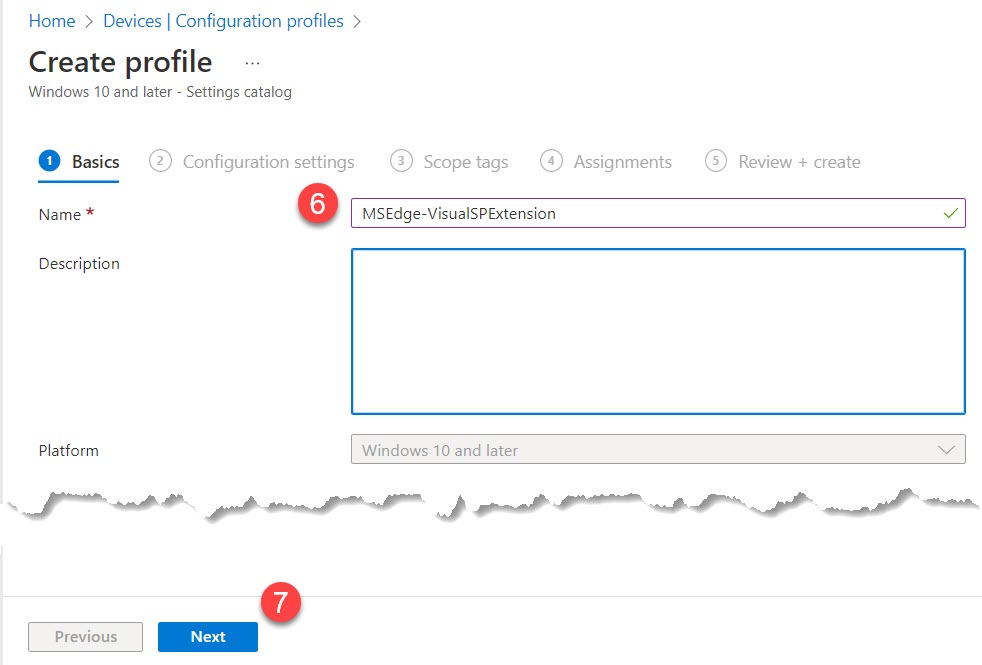
- Insert the profile name
- Click Next
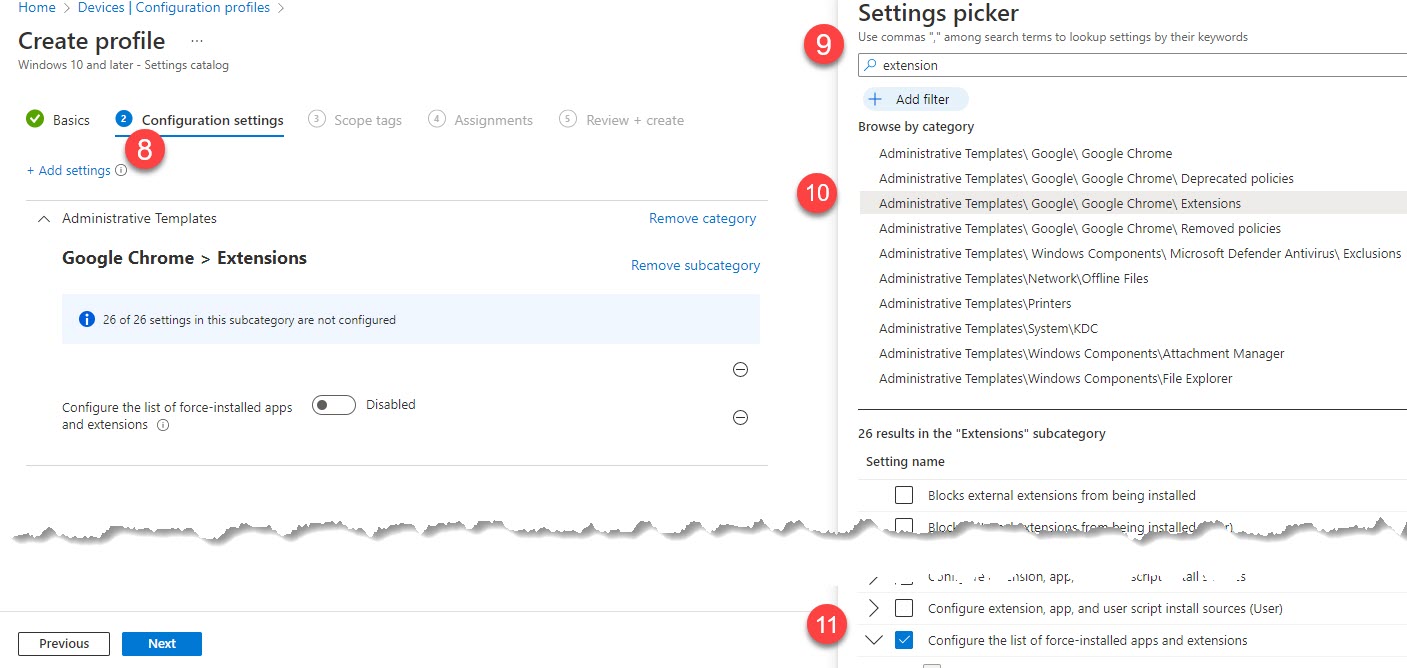
- On the next screen, click Add settings
- Search for extension
- Select "Administrative Templates\Google\Google Chrome\Extensions" or "Microsoft Edge\Extensions"
- Select "Configure the list of force-installed apps and extensions" for Chrome or "Control which extensions are installed silently" for Edge.
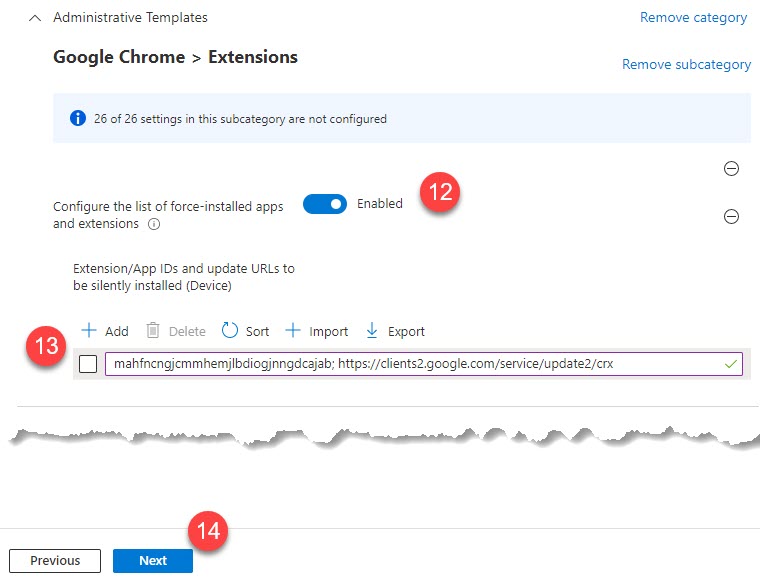
- Enable the option to Control which extensions are installed silently (Edge) or Configure the list of Force-installed apps and extensions (Chrome)
- Add the appropriate app ID (found earlier in this article). Make sure there is no leading space in the ID
- Click Next until you finally click Create
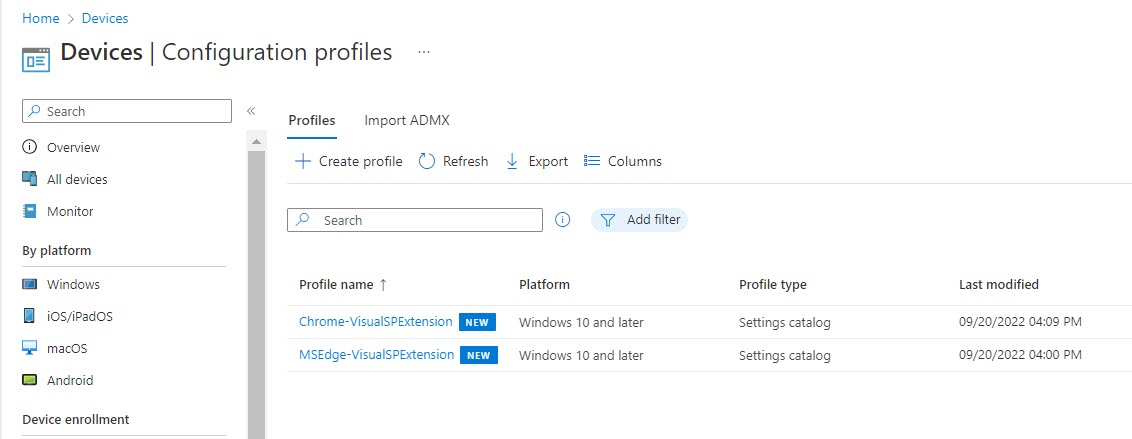 Assign the appropriate groups to the profile. Once configured, the groups will get the extension on the next sync, which is usually around 2 hours. Click next.
Common InTune Problems and Troubleshooting
InTune is the most modern device configuration tool within the Microsoft ecosystem, and many organizations consider it to be the best method for configuring devices - especially when the intended audience includes remote workers. Since the complexity of customer environments differ, it is important to understand what factors could cause inconsistencies across users. Here are a number of these factors to investigate if some of your users are not receiving the installation.
- Device Not Enrolled: The device must be properly enrolled in Intune. If it’s not, it won’t receive any policies.
- Policy Conflicts: If there are conflicting policies with different settings, Intune may not be able to apply them.
- Platform Incompatibility: Some policies are platform-specific. For example, an iOS policy won’t apply to an Android device.
- Network Issues: The device needs a stable network connection to communicate with Intune servers. Without it, policies can’t be applied.
- License Issues: The user or device must have the appropriate Intune license assigned.
- Compliance Issues: If the device is not compliant with existing policies, new policies may not be applied.
- Pending Policies: Sometimes policies are in a pending state and haven’t been processed yet.
- Device Sync Issues: The device might not have synced with Intune recently. Regular syncs are necessary for policy updates.
- Policy Assignment: Ensure that the policy is correctly assigned to the user or device group.
- Policy Removal: Sometimes, policies might be removed or not applied due to errors in the policy removal process.
The following Microsoft article is very helpful when trying to identify which problem(s) might be affecting any given user or device.
Addressing compatibility or performance problems in specific applications
If you discover that one of your organization's web applications has a compatibility or performance problem with our browser extension, the best way to address this is not to completely uninstall the browser extension. The same Group Policy or InTune policy you use to deploy the extension can also block the extension from being loaded for the specific domain name causing the conflict. Please use the Using Group Policy to block a domain from our browser extension knowledge article.

