

Trusted Script Integration (TSI) is a feature in your subscription that allows VisualSP to run securely in sites that are protected by a Content Security Policy (CSP).
A CSP is a tool that cloud providers or system administrators use to restrict domains from which scripts, iframes, or other assets can be loaded. A CSP is a good thing that makes your organization’s use of online applications more secure. However, it also poses challenges when you are using enterprise-deployed front-end tools to manage and support your environment, such as VisualSP.
Trusted Script Integration allows the VisualSP browser extensions to add support for VisualSP domains into the CSP for web applications where needed.
- TSI does not remove CSPs from your systems. It securely adds our specific domains into a CSP at the browser level as the application is being browsed.
- TSI does not collect any additional information beyond what the VisualSP system already uses.

- TSI does not automatically apply everywhere. The setting above allows the feature to be used within your subscription. It is then turned on specifically for applications where necessary.
- VisualSP automatically defines and manages dozens of applications for you (SharePoint, Salesforce, Dynamics, Gmail…). For this set of built-in applications, we will monitor and manage which ones require TSI to be turned on.
- If you define custom applications within your subscription, but the VisualSP tab does not show when you browse them – this may be due to a CSP that is part of that application. In this scenario, the Subscription Admin will need to configure Trusted Script Integration for the application using the instructions below.
- Click the … button in the upper right corner of the VisualSP panel.
- Select the Manage my subscription option
- Click the Applications tab.
- Click the Define Applications tab shown there.
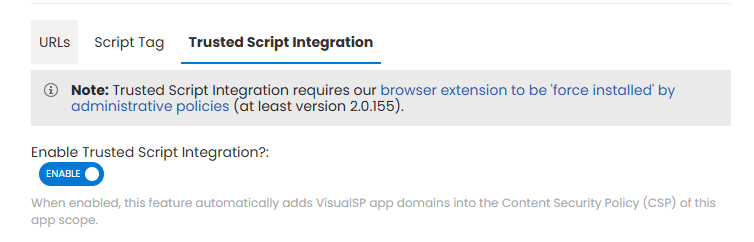
- Select the desired application from the left menu and then the Trusted Script Integration tab from the active pane.
- Click to set the Enable Trusted Script Integration to ‘Enable’ and click ‘Save Application’ to apply the changes.
It is important to note that the TSI settings are loaded for an end user after they have successfully activated into your subscription. This means that new users (or users with new devices) may not see the tab in CSP-enable activations until after they have successfully loaded the VisualSP tab somewhere else the first time.
Manually Embedding CSP headers in a Custom Web App
If you are not using the VisualSP browser extension but wish to add our domains to the CSP for a web server or application that you control within your organization, the following details clarify what is needed.
Add the following directives:
script-src ‘self’ [‘https://*.contextall.com’, ’https://visualspmedia.azurewebsites.net’,’https://visualsponline.azurewebsites.net’, ’https://fonts.gstatic.com’, ’https://fonts.googleapis.com’, ’https://*.clarity.ms’]
image-src ‘self’ [‘https://*.contextall.com’, ’https://visualspmedia.azurewebsites.net’,’https://visualsponline.azurewebsites.net’, ’https://fonts.gstatic.com’, ’https://fonts.googleapis.com’, ’https://*.clarity.ms’]
frame-src ‘self’ [‘https://*.contextall.com’, ’https://visualspmedia.azurewebsites.net’,’https://visualsponline.azurewebsites.net’, ’https://fonts.gstatic.com’, ’https://fonts.googleapis.com’, ’https://*.clarity.ms’]
font-src ‘self’ [‘https://*.contextall.com’, ’https://visualspmedia.azurewebsites.net’,’https://visualsponline.azurewebsites.net’, ’https://fonts.gstatic.com’, ’https://fonts.googleapis.com’, ’https://*.clarity.ms’]