

One of the key features of VisualSP is its flexibility in allowing admins/editors to customize their content to better suit their organizational needs. VisualSP provides Content Packs which may provide 1000’s of global content items to help your organization get started with their Digital Adoption needs. We also understand that an organization may wish to modify existing global content items rather than create new custom content so we have provided a simple method to get started.
Create a Modified Copy
To create a modified copy of a global content item, an admin/editor can start by accessing the VisualSP DAP application menu in the help panel by clicking the ellipsis (…). From here the user may choose to work in the 1) Manage All Items screen or, if the item is visible in the help panel of the current application scope, the user may 2) Enable Edit Mode in the application and then hover over the desired item and click the 3) pencil icon to edit.


Once the desired item is open in the Editor panel, make the desired changes to the item and then click the Save button. The Editor panel will reload with a confirmation that this item is now a modified copy and provides the user with the appropriate control to revert the item back to it’s original state.

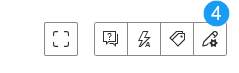
An admin/editor can identify all Modified Copies in the Manage All Items panel by selecting the desired application scope from the dropdown and then clicking the 4) menu shortcut for showing customized items and viewing the item’s 4) Customization Status to look for 6) “Modified Copy”

Reverting a Modified Copy
An admin/editor may be asked to return a modified copy of a global content item back to it’s original state, a process that VisualSP refers to as Reverting to Original
Reverting a modified copy of a content item can be performed for an individual item in the Item Editor panel by locating the 7) Modified Copy notice at the top of the editor and then clicking the 8) “Revert to Original” button

Review the 9) prompt and then Click “Yes” if you agree to revert the modified item back to it’s original state.

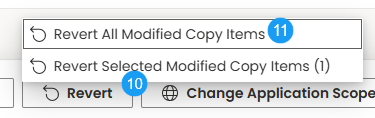
Admins/editors my also perform a Bulk Revert in the Managed All Items panel (as described above) by filtering on customized content and then checking the box next to each content item to select it. Then Click the 10) Revert button in the table footer and then choose between 11) Revert All Modified Copy Items or Revert Selected Modified Copy Items from the resulting menu.
Review the 12) prompt and then Click “Yes” if you agree to revert the selected (or All) modified items back to their original state.

A Reverting Items prompt will appear while the process completes

A confirmation prompt will appear after successful reversion with a summary (item count)
